Destiny 2‘s newest dungeon, Sundered Doctrine, drags players back to Rhulk’s pyramid ship once again in the third Episode of the 2024-2025 release year. In the imposing monolith of a ship, you’ll face leaderless Dread with an unknown goal; your goal, however, is clear. Fight through the dungeon’s challenges and discover the truth of what the Dread are looking for.
In a departure from recent dungeon trends in Destiny 2, Sundered Doctrine features bosses with remarkably low health totals. This, of course, is compensated for by increasingly difficult mechanics that take finesse and coordination to pull off successfully. After Vesper’s Host’s tanky final boss, perhaps this change is a placating measure towards those who cried artificial difficulty when Vesper’s Host was released, or it could be that Bungie’s puzzle-makers are finally hitting their stride again. Either way, you’re going to need to keep your wits about you as you delve deep into what used to be Rhulk’s domain.
Traversal: Entering The Pyramid Ship
Before You Get To First Encounter, You Need To Get In The Building
Once you’ve picked up the quest to complete Sundered Doctrine from Ikora, you can travel to the dungeon using the node next to the Vow node in the Throne World. When you land, you’ll have a hike in front of you. Head forward until you reach a large chasm, then take the bridge to your left, jumping up onto the ledge to the left of that. Take the first path leading right, then drop into the room below.
There are no secret chests before the first encounter; the secret chests in this dungeon are found after encounters one and two.
You’ll encounter a few enemies, but it shouldn’t be anything tricky. After defeating them all, you’ll see a rectangular formation sticking out of a wall in the second hallway on the left, which you should jump onto and pass through once it moves. Drop down through the gaps in the space that follows, falling into another room with some enemies. Find the small waterfall on the front right side of the room once the room is clear; heading through it and down the path will take you to the dungeon’s first encounter.
Encounter 1: Flooded Inspection
A Non-Boss Encounter, But Complex Nonetheless

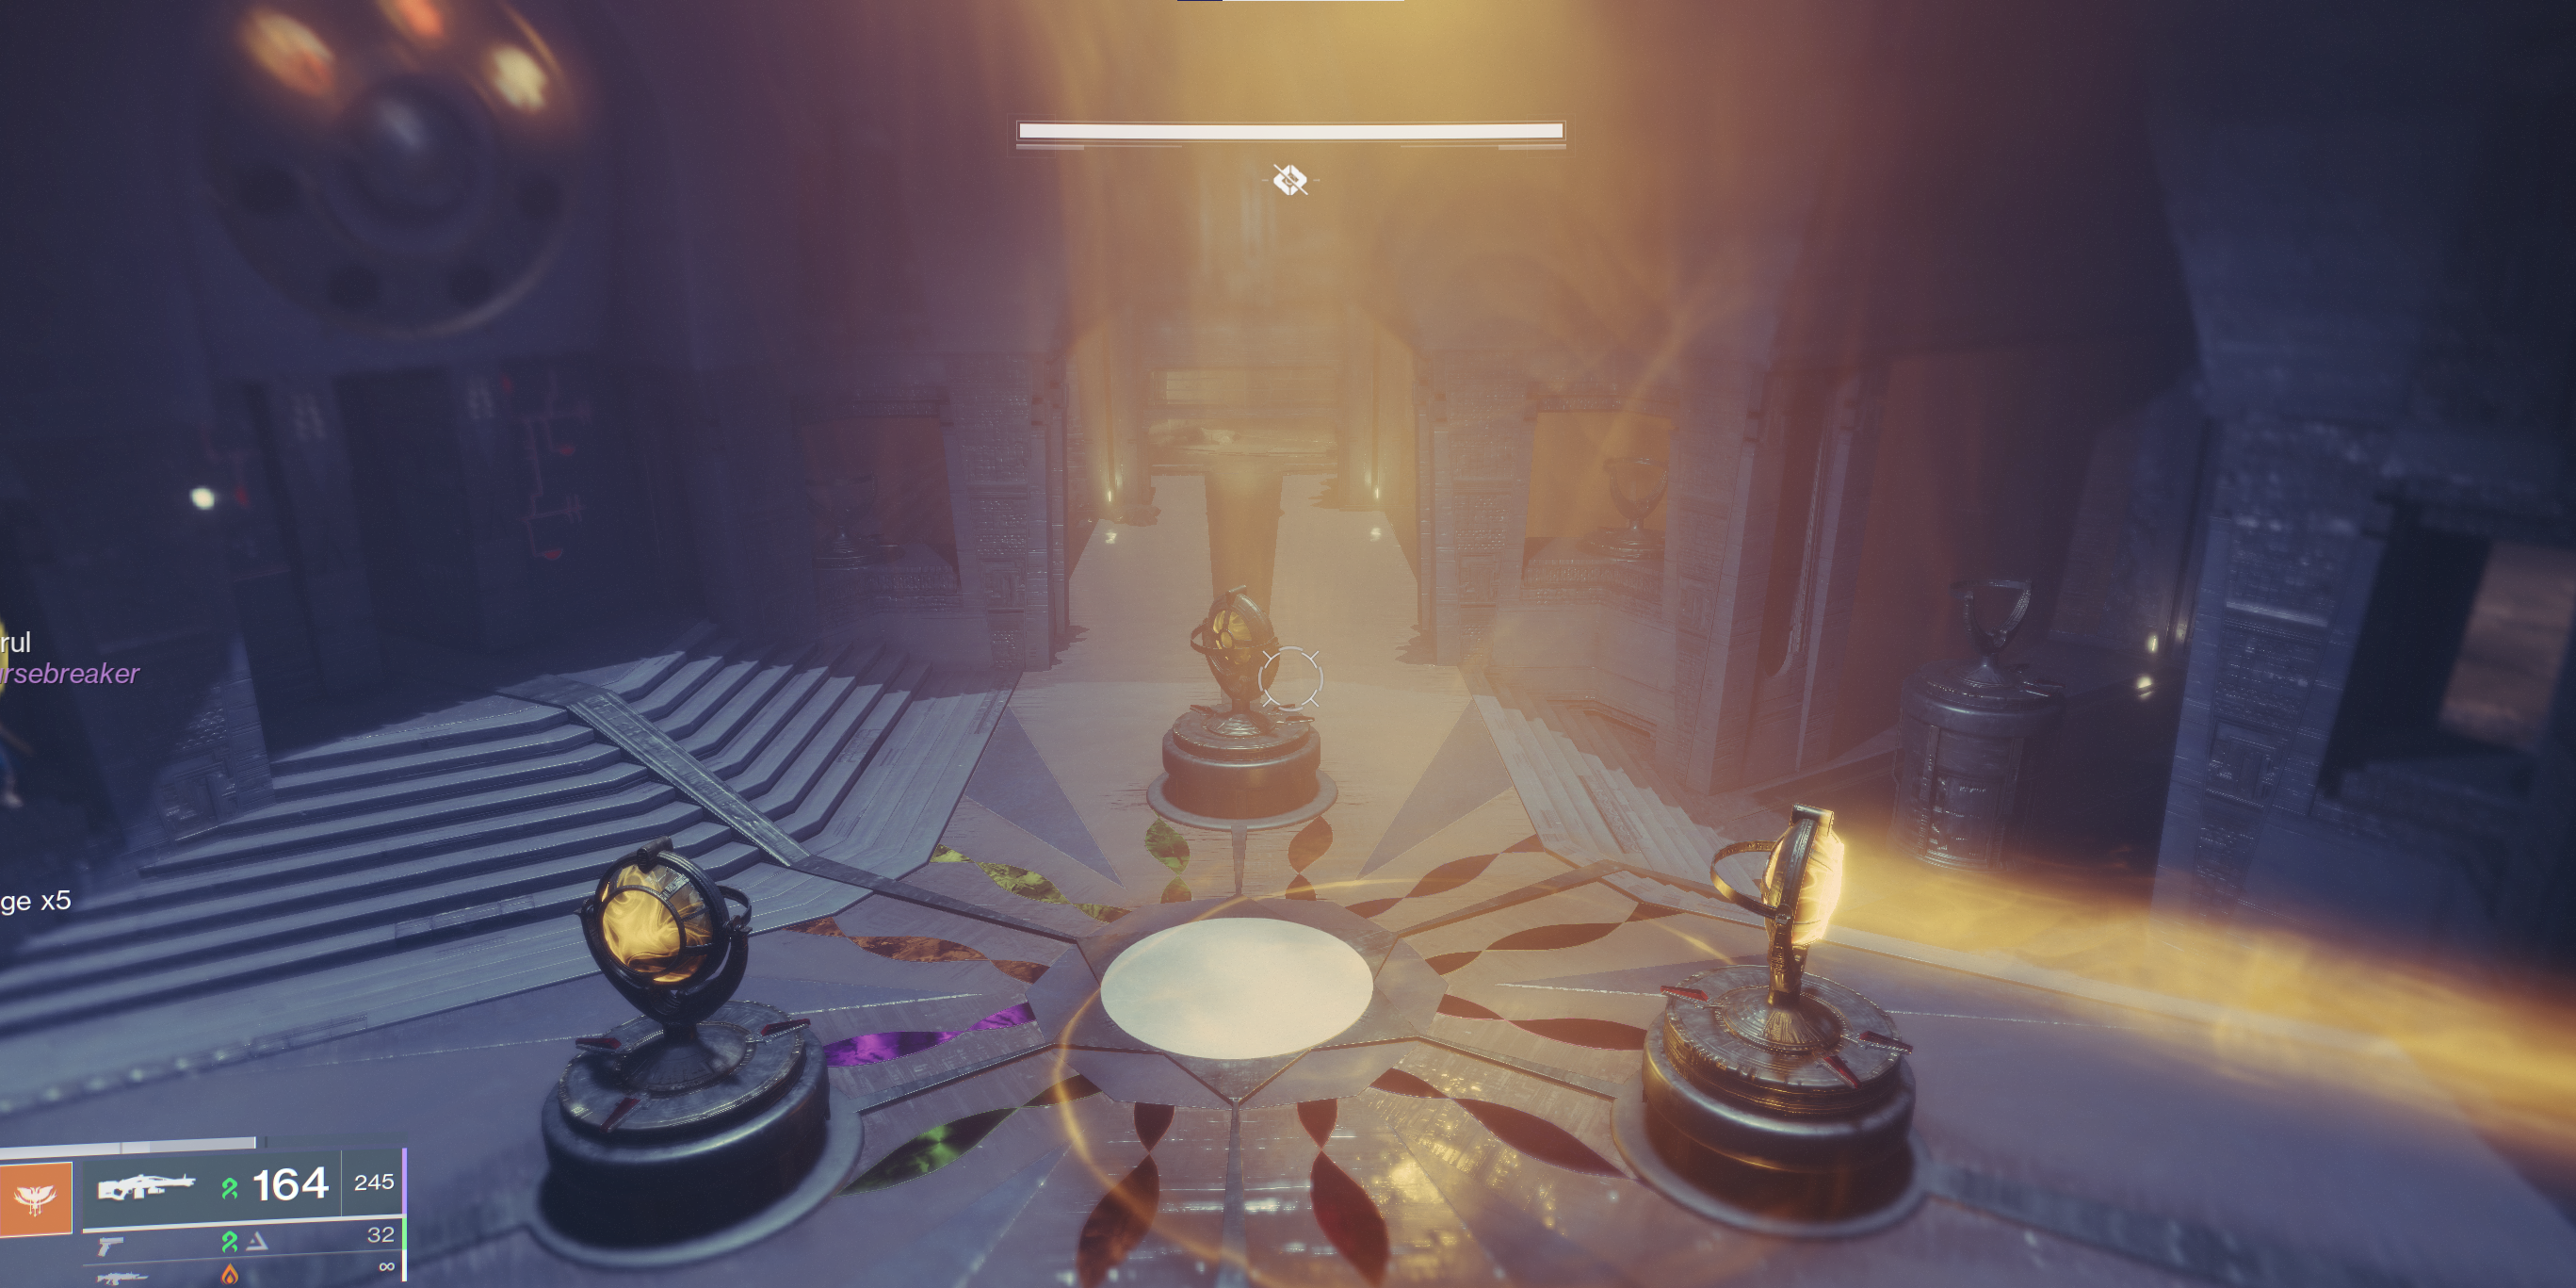
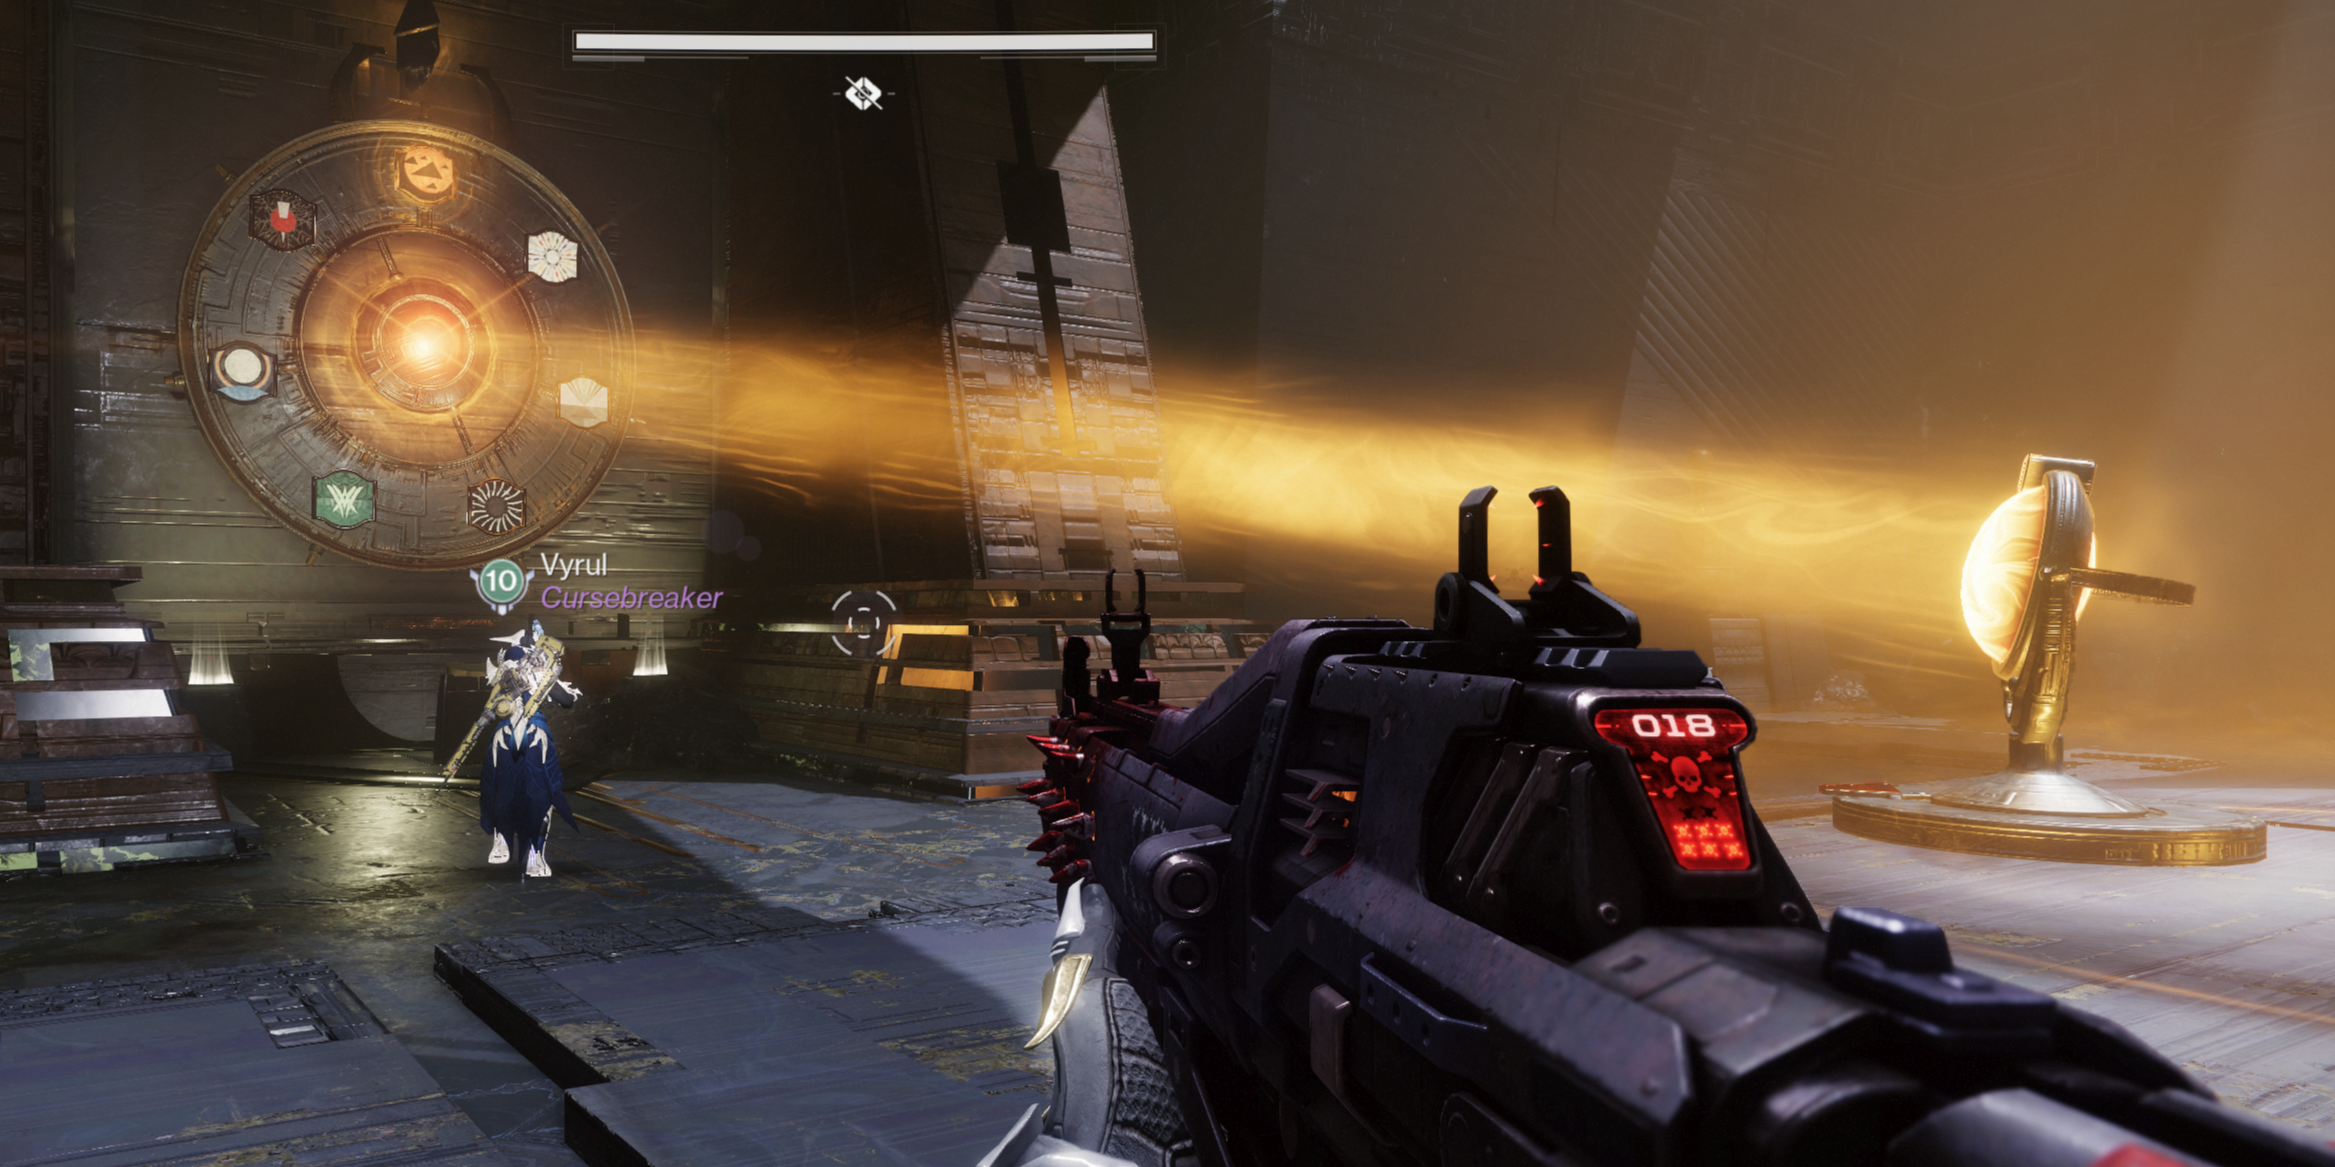
You’ll immediately notice a few things when you arrive in the first encounter’s chamber. First, you’ll see the beam of Darkness pointing from a focusing lens at a large wheel mounted on the wall. This wheel has the same symbols from Vow of the Disciple placed on it; this is the dungeon’s main mechanic. Furthermore, there are four rooms surrounding the central room.

Related
Destiny 2 Roadmap 2024-2025: Season Pass, New Content & Update Schedule
After ending one saga, Bungie has detailed what to expect from Destiny 2 as it continues into 2025, braves new frontiers, and begins a new saga.
Each room has a wheel similar to the one in the middle chamber, though the outer room’s wheels have only one symbol compared to the middle chamber’s three. When the encounter begins, one of these three symbols will go blank, and the other two should change.
The encounter works like this:
- Scout each of the four outer rooms to look for a Truthspeaker Grim. This Grim will only appear in one of the rooms and drops the symbol you need to remember when you defeat it.
- Find the room whose wheel contains the symbol dropped by the Truthspeaker.
- Using the Darkness beams, link the wheel in the main room to the wheel with the correct symbol by rotating the lenses to point the Darkness beam to the proper wheel. Then, shoot the shards above the lenses in the central chamber.
- If a lens is missing, search for one (or more than one) of the four Lens Bearer Subjugators that spawn, defeat them, and bring the lens they drop to the empty place.
- Connect the wheel in the central chamber to the wheel holding the symbol dropped by the Truthspeaker.
Once you’ve followed these steps successfully, a notification on the left side of the screen reads, “The Pyramid accepts a truth.” This means you’ve completed the first part of this encounter and should return to the middle room, where two symbols will now be needed. Once you connect two successfully, you’ll need to do, you guessed it, three total symbols for the final phase of the encounter.
You can see where each lens can point by looking at the small indicators around its base.
It can be pretty tricky to line everything up properly, and if you line up a beam with the wrong wheel, your lenses will despawn, and you’ll have “failed” the step. You’ll need to start over from that step, gathering more lenses and aiming the beams in the right direction once again. Finish all three phases correctly, and you’ll move on to the next part of the dungeon: the maze.
Traversal: The Maze
Channel Your Inner Indiana Jones To Make It Through

Once you exit the first encounter, you should drop down off the side of the stairs, continuing to make your way down until you reach the bottom and enter the maze. In the maze, take your first right and go until you reach the end, drop down, and look right. Following the righthand hallway, take your first left and then up the stairs to exit the maze.

On the other side of the maze, you should see a big, open area with adds to clear, but nothing too serious. Follow the bridge on the right to reach a long hallway, making your way to the third exit on the left-hand side, where you can find a hole to drop down. You’ll fall into a long room with a trench in the middle, which you should avoid as you make your way to the other end of the room.

Under the ledge across from you on the far corner of the room, you’ll see a small opening that you can enter through. The other side of this opening will reveal a classic, Indy-style boulder trap. As long as none of your fireteam likes to prank you like mine does (I can’t believe Eager Edge still exists just to help my fireteam kill me), you should have no trouble using the divots in the side of the hall to make your way up past the boulder and into the hole that leads to encounter two’s door.
Encounter 2: Altered Convolution And The Zoetic Lockset
Open The Main Door, Then Defeat The Lock
The second encounter builds on what happened in encounter one, but you have to open the door before you get there. To do this, there are a few things you’ll need to know. The main mechanic here is using the Resonance lights to highlight certain symbols on the door by rotating the highlight’s placement.
You’ll need to defeat Perceptor Wizards to obtain stacks of Knowledge, and the number of stacks you have—the number of Wizards you defeat—determines how many spaces the highlight moves. The inner wheel determines which direction the highlight moves and can be changed by shooting the Darkness shard above the wheel.
One Perceptor Wizard gives Heightened Knowledge, two give Brimming Knowledge, and three give Overflowing Knowledge, similar to the Psion Puzzle from the “Temptation” quest of The Final Shape‘s campaign.
Once you finish highlighting the proper symbols, denoted on either side of the door leading to the encounter, that door will open.
The Zoetic Lockset
This encounter is complex, and it has many moving parts to it. The arena has four wheels, four Shrieker enemies, and four “screens” tied to each Shrieker. For ease of explanation, my fireteam and I called them one through four, from left to right.


Related
Every Destiny & Destiny 2 DLC So Far, Ranked
Destiny 2 has had ten years of expansions that helped craft this beloved sci-fi looter-shooter, but each one now has a spot in the hierarchy.
Each symbol on each wheel is paired with a specific event, which is important to note as it will determine how the encounter plays out. All four wheels have the same symbols. The symbols and their meanings are as follows:
|
Symbol |
Event |
|---|---|
|
Empty |
Nothing happens. |
|
Stop |
Pause the progress bar for 10-11 seconds, which can be used to prolong the DPS phase. |
|
Hive |
Spawns 2 Ogres, one on the right and one on the left. |
|
Knowledge |
Spawns groups of adds including Acolytes, a Knight, and three Wizards. |
|
Commune |
Shriekers shoot out Darkness bees, which track players and deal damage. |
|
Kill |
Begins DPS phase. |
Also unique to this encounter is a “Lockset Progression” bar underneath your health bar, filling up in four sections, 15 seconds at a time. At certain percentages, certain events will occur in the arena. The percentages and their corresponding events are as follows:
- 0%: Shrieker 1 reads Wheel 1 and activates an event based on the highlighted symbol.
- 0% – 25%: Wheel 1 is lit. Shrieker 1 is attacking.
- 25%: Wheel 1 is no longer lit. Shrieker 2 reads Wheel 2 and activates an event based on the highlighted symbol.
- 25% – 50%: Wheel 2 is lit. Shrieker 2 is attacking.
- 50%: Wheel 2 is no longer lit. Shrieker 3 reads Wheel 3 and activates an event based on the highlighted symbol.
- 50% – 75%: Wheel 3 is lit. Shrieker 3 is attacking.
- 75%: Wheel 3 is no longer lit. Shrieker 4 reads Wheel 4 and activates an event based on the highlighted symbol.
- 75% – 100%: Wheel 4 is lit. Shrieker 4 is attacking.
- 100%: Wheel 4 is no longer lit, then the bar resets to 0%.
There’s a lot going on in this encounter, but it can be done solo if one of your fireteam members feels froggy. Pick someone to be your wheel-person, while the other two do add clear and support. Note as well that the highlighted symbol on each wheel will change automatically after it’s been “read” by a Shrieker. You can prevent this automatic progression by banking Knowledge into the wheel before that wheel’s Resonance glow goes away. It’s a wild ride, but here are the basic steps you should take to defeat this encounter:
- Reverse the direction of Wheel 1, allowing it to advance closer to Knowledge once the progress bar reaches 25%.
- Change the directions of the other wheels so that their automatic advancement, which occurs after they turn off, moves them closer to Stop or further from Hive to avoid Ogre spawns.
- Change W4 to Stop after picking up the right amount of Knowledge from Wizard spawns; W4’s symbol will be locked onto the Screen.
- W1, W2, and W3 will be read and locked onto their respective Screens from right to left as they’re read. The wheels are read in order left to right, but only the rightmost, unlocked wheel will be locked in each round.
- After W3 and W2 are locked, make sure W1 is set to Kill. When Kill is locked onto any one of the screens, DPS will begin.
- Do damage to Shriekers for the duration of the DPS phase, killing adds that spawn.
- Wheels will be reset to Empty-Knowledge-Empty-Knowlege; repeat steps 3-6 until the Zoetic Lockset is defeated.
Unfortunately, this encounter is easier said than done. The steps may seem simple, but the wheels’ automatic advancement is more of a hassle than you might think, so make sure you’re staying on top of the symbols and progressing them at the proper times to avoid having to deal with this. Either way, you want to make sure you lock in Kill-Stop-Stop-Stop to get the longest DPS phase possible.
Traversal: Down The Waterfall
Make Your Way To Third Encounter Easily
Once you finish the encounter, the screens will be changed to display Give-Darkness-Enter-Pyramid, which is your clue to moving forward in the dungeon. You should shoot one of the eyes of the defeated Zoetic Lock Shriekers into the spot in front of the door. This will open the door, allowing you to move into the second traversal section of the dungeon.
Related
Destiny 2: How to Find Metastasized Essentia & What It Does
A new Episode of Destiny 2 means more new and beguiling currency to spend across the Sol system; Metastasized Essentia is confusing, but important.
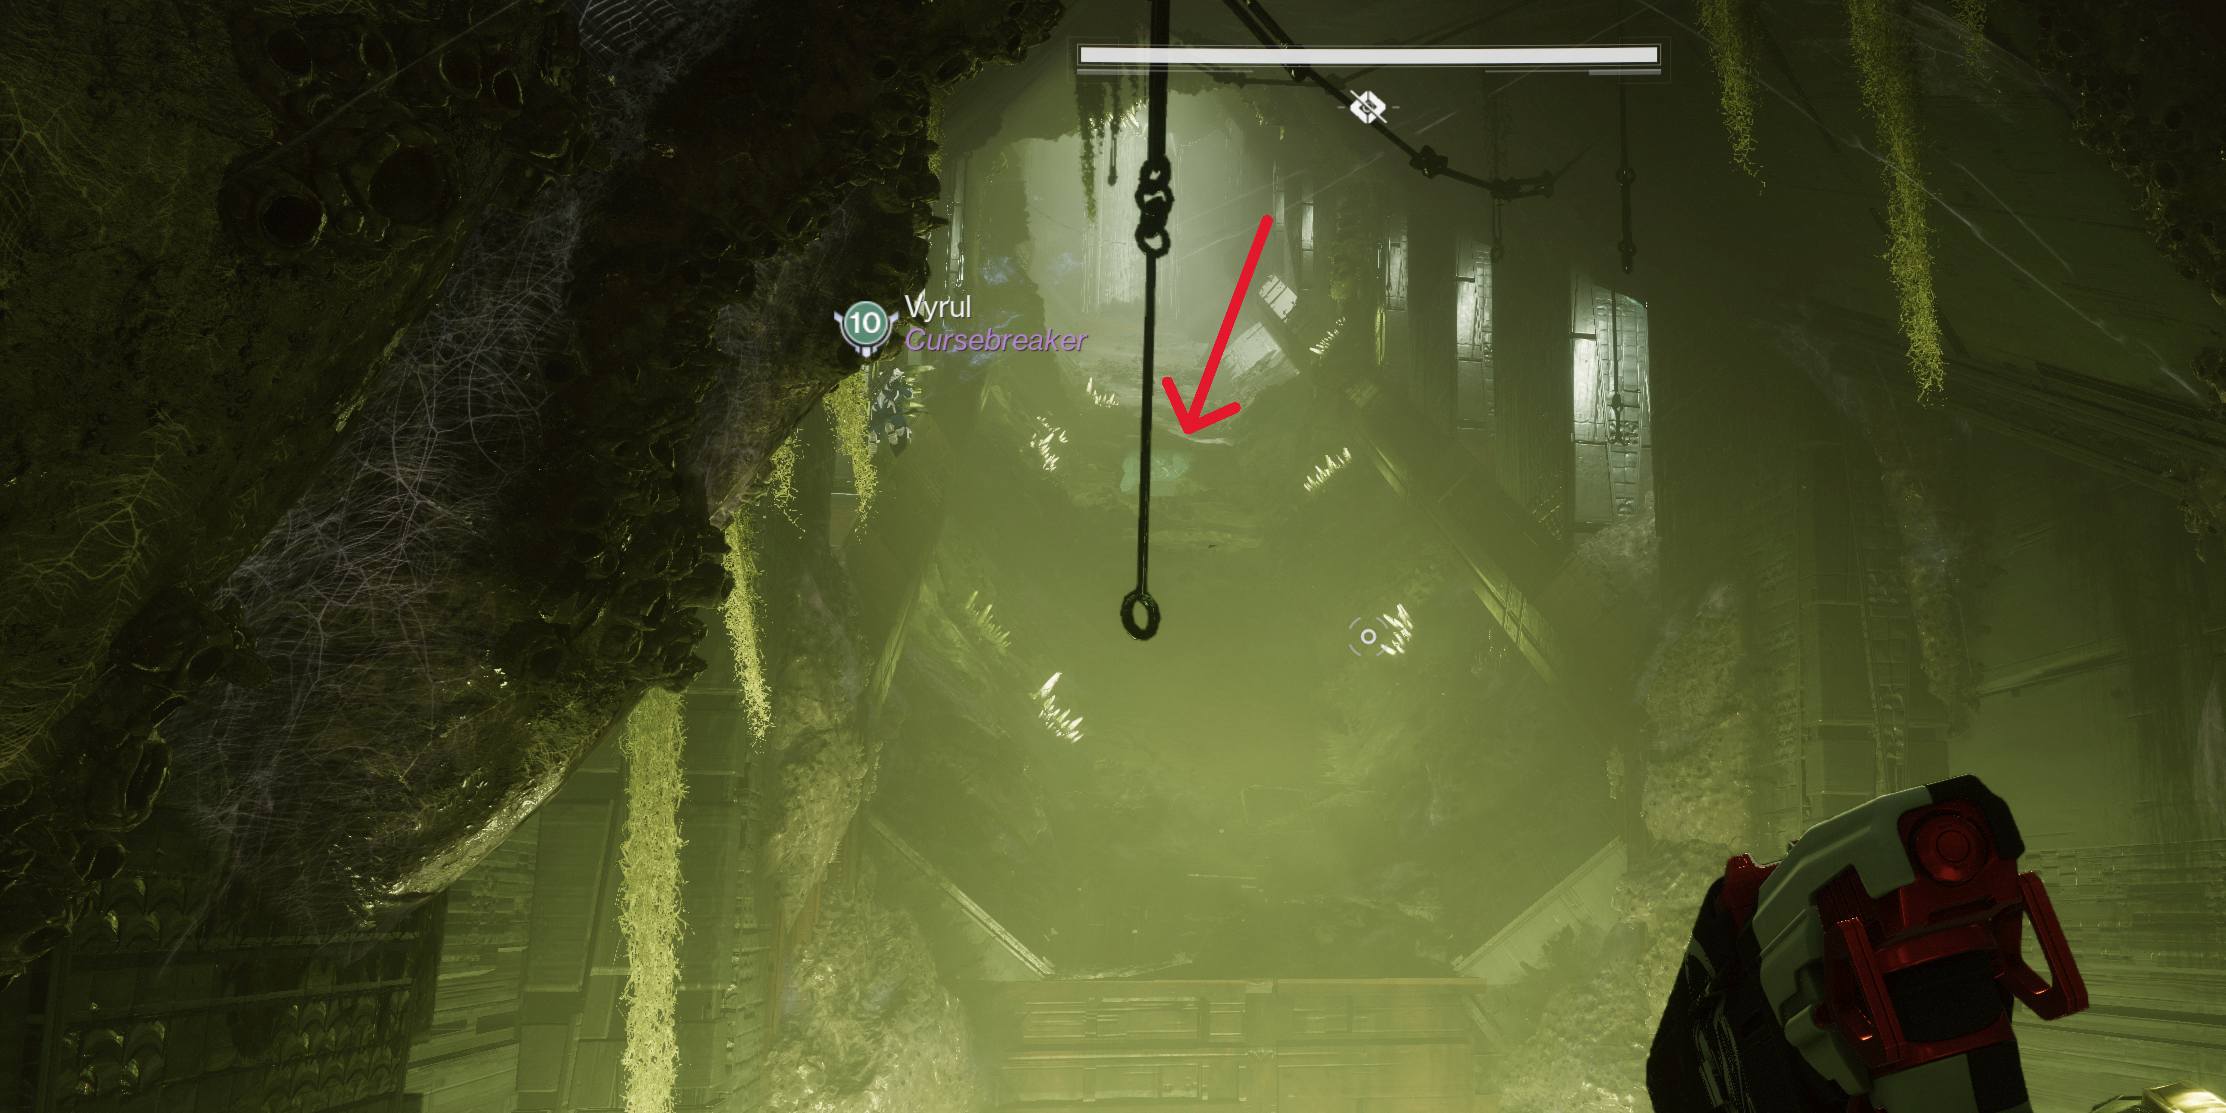
After heading through the door out of encounter two, you should hop on down the waterfall and continue to make your way through Rhulk’s horrible pyramid ship. Once you reach the large room with the worm husk, traverse upwards. Eventually, you’ll reach a huge Hive ribcage that you should walk through. On the other side, you’ll run into—surprise!—another light puzzle with more lenses.
Thankfully, this puzzle is a direct rip from the first encounter. You should point the light at the corresponding symbols to open the door with the Enter symbol above it, which leads you to yet another large room and a seemingly locked door. This final door requires you to shoot at it to open it, and how far it opens directly correlates to how much damage you do, so whack it as hard as you can to enter the third encounter.
If you’re not sure which door is the proper one, your Ghost’s nav mode can direct you in the right direction.
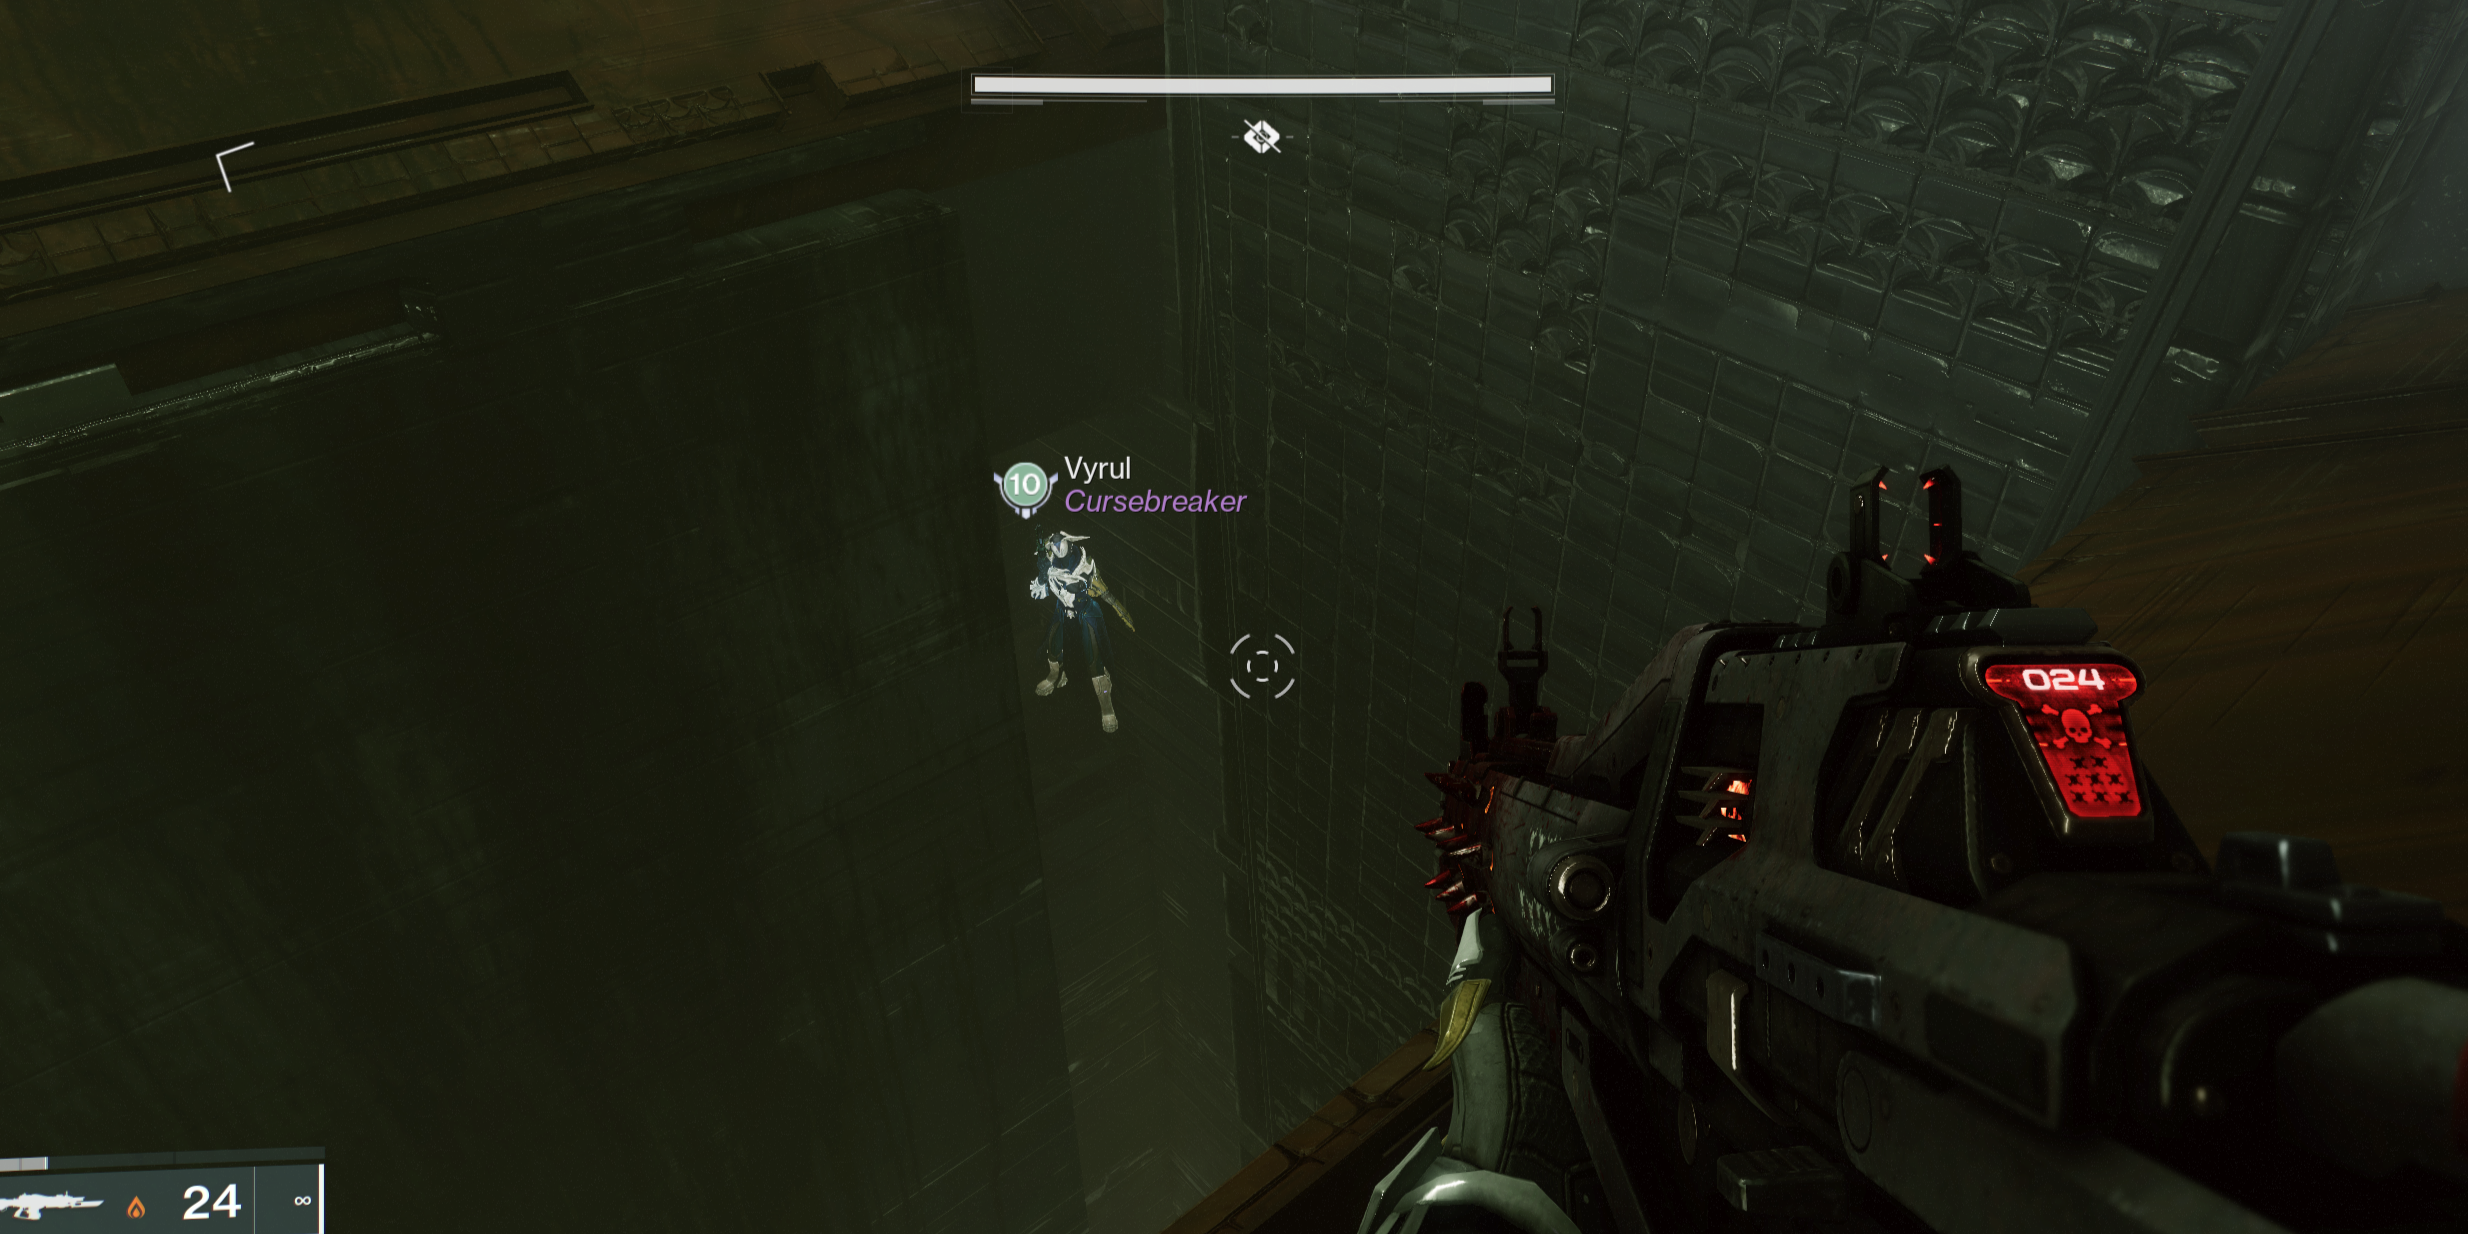
Encounter 3: Kerrev, The Erased
Separate Truth From Lies In The Final Encounter


Encounter three includes mechanics from both the first and second encounters, culminating in one final test of your fireteam’s skill and teamwork. Let’s set the stage; the main room contains a wheel with six symbols on it, three on the left and three on the right. The two rooms on either side of the main room have wheels with static symbols on them. The left room contains the Pyramid, Traveler, Witness, Hive, and Guardian, while the right room contains Light, Darkness, Witch Queen, and Worm. The main room contains the main wheel, with Worship, Kill, and Drink underneath down the stairs.

Related
Destiny 2 Just Killed Off A Fan-Favorite Character, With Major Repercussions For The Game’s Future
Though Destiny 2 is at one of its lowest points, Bungie has once again delivered a high-quality product that shows where the franchise is heading.
This encounter is actually simpler than the second, in my opinion. Essentially, the main wheel will display two statements through its symbols; divide the wheel in left and right halves, then read it from the top to the bottom to read the statements, one on the left and one on the right. These two statements will be random, but know that one will be true to the lore of the game, and one will be false.
Using your knowledge of the game, determine which is which. If you’re not sure which is true, run around until you find a Truth-Seeker in either room and look at the symbol that it drops. The symbol that is dropped will be part of the statement that is true, and the other statement is a lie.
Once you know which statement is false, you’ll need to run around and point the Resonance beams at the wheels containing the symbols from the false statement. In the same way you did in the first encounter, use the lenses to shine the beams on the false statements before going to the center room and activating the main wheel to send out the beams. If you’ve done it correctly, you should hide in the underground rooms or in the shadows of pillars while the boss’s shields burn away, allowing you to deal damage.
Some lenses will be “entangled,” preventing you from rotating them. To un-entangle a lens, you’ll have to destroy three Darkness thorns that will be nearby. To be able to damage these thorns, you’ll need to kill an Unwritten Attendant that gives you the Unwritten Empowerment buff.
Repeat these steps of reading, moving beams, and activating the wheel until you’ve defeated the boss. The DPS phase isn’t super long, and Kerrev’s stomp also suspends you, making it essential to stay moving and avoid his attacks while you deal damage. If your fireteam is struggling to hit shots, there’s no shame in a Cenotaph+Divinity Warlock to help you hit your crits. No matter the strategy you employ, Destiny 2‘s newest dungeon should be complete. Sundered Doctrine is reminiscent of Vow of the Disciple, which is inarguably one of Bungie’s best raids, so this dungeon should be a thrill for anyone looking to relive the nostalgia of taking down Rhulk in his own home.

- Released
-
August 28, 2017
- ESRB
-
T For TEEN for Blood, Language, and Violence
Source link